Lloyd — Nov 23, 2025
The current paradigm of AI-assisted software development is often plagued by a subtle but pervasive friction: the necessity of constant, vigilant supervision. Rather than operating as an autonomous engineer, the AI frequently functions like a learner driver, requiring the human operator to sit in a state of perpetual anxiety, ready to slam on the brakes at the first sign of hallucination or context drift. Architect Mode creates a rigorous separation of concerns between planning and execution, transforming the AI from a frantic coder into a disciplined systems architect.

The Motivation: The “Baby-Sitting” Dilemma
The genesis of Architect Mode lies in a fundamental inefficiency observed during complex coding tasks with Large Language Models (LLMs). In standard interactions, the human operator is often tethered to the terminal, watching character-by-character output to ensure the model doesn’t deviate from the specification. This supervision overhead negates the primary benefit of AI automation.
I couldn’t get out of my chair. And I couldn’t stop watching, because the second I did, Claude would go and do something dumb. He’d like jump the API on an HTML parser… or he’d give up on the goal that I gave him and implement some fake solution.
This phenomenon creates a bottleneck. The human developer acts like a driving instructor, their foot constantly hovering over the brake pedal (or in this case, the escape key). The model, burdening itself with the immediate implementation details, loses sight of the broader system architecture. It begins to “hallucinate” solutions that fit the local context but break the global design.
The core problem is context overload. When an AI attempts to hold the entire codebase, the immediate diff, and the long-term goal in its active context window simultaneously, signal degradation is inevitable. It leads to “remodeling” rather than “building”—a process inherently more complex and error-prone.
The Solution: Introducing Architect Mode
Architect Mode is a methodology—and a technical framework—designed to enforce constraints and ensure high-fidelity execution on medium to large-scale projects. It operates on the principle of Forced Restraint. By preventing the AI from writing code until a rigorous planning phase is complete, we eliminate the “ready, fire, aim” loop that characterizes most failed AI coding sessions.
The key idea about architect mode… was that what I was doing is basically just sitting in my chair and watching… having to watch with my finger basically hovering over the escape key.
Instead of immediate coding, Architect Mode forces a “Plan Before You Act” protocol. It acts as a higher-level oversight mechanism, a “System Orchestrator,” that maintains a pristine context of the project’s goals while delegating specific, sandboxed tasks to worker instances. This allows the Architect to remain in a “zen-like state,” focused purely on intent and verification, rather than getting bogged down in syntax errors or implementation minutiae.
Installation and Usage
Architect Mode is available as a plugin for Claude Code, designed for frictionless integration into your existing development workflow. The installation process takes less than a minute.
Step 1: Add the Marketplace
From within Claude Code, add the Headlands marketplace:
/plugin marketplace add headlands-org/claude-marketplace
Step 2: Install the Architect Plugin
Install the Architect plugin from the marketplace:
/plugin install architect@headlands-claude-marketplace
Step 3: Invoke Architect Mode
Run the /architect command with your engineering goal:
/architect migrate user authentication from sessions to JWT tokens
That’s it. You initiate a session not by asking for code, but by defining the mission. The system will then automatically transition into the Architect workflow, refusing to write implementation code until it has satisfied its internal requirements for understanding and planning.
Example Use Cases
Database Migration:
/architect add caching layer to the API without changing the database schema
Multi-Component Refactoring:
/architect extract payment processing into a separate microservice
Performance Optimization:
/architect reduce API response time by 50% through query optimization
Deep Dive: The Mechanics of Architect Mode
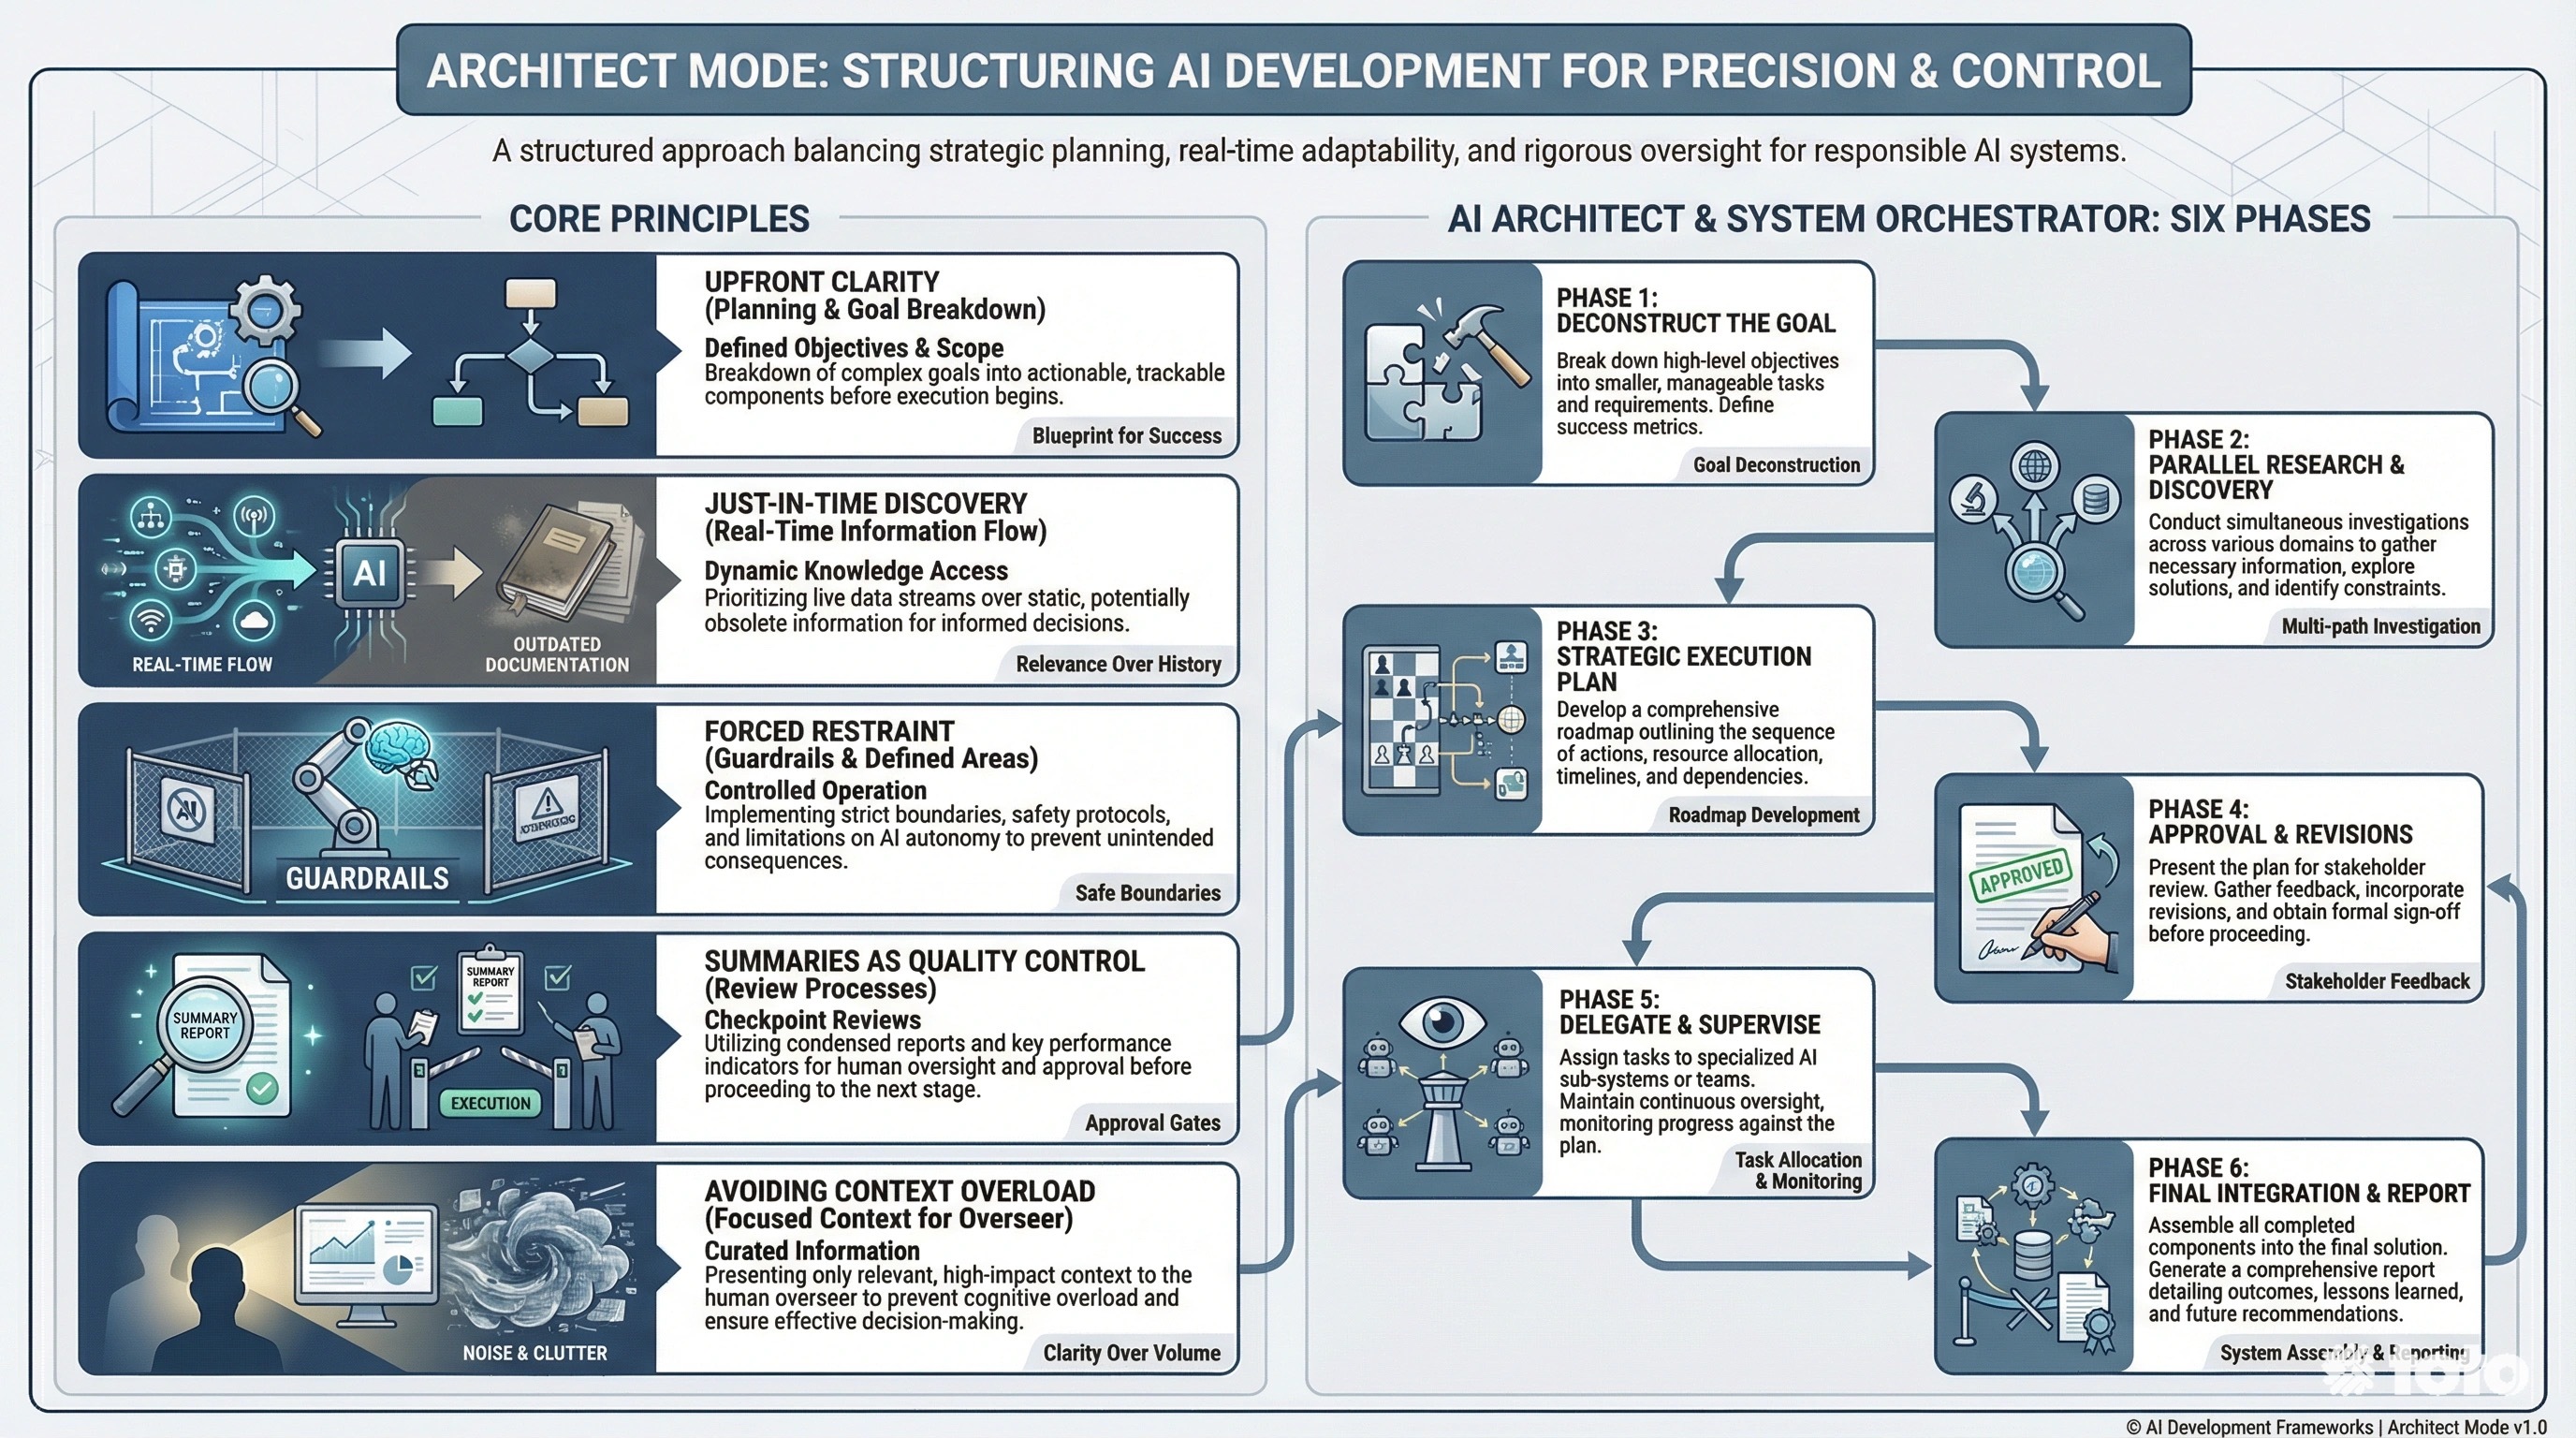
The efficacy of Architect Mode is not magic; it is the result of a structured, six-phase engineering process that enforces discipline. This process mirrors senior engineering workflows, ensuring that no line of code is written without a validated blueprint.
Phase 1: Deconstruct the Goal
The Architect begins by breaking down the high-level request into core engineering objectives. It restates the mission to confirm understanding, ensuring alignment before resources are consumed.
Phase 2: Parallel Research & Discovery
Instead of relying on stale documentation or assumptions, the system formulates specific research questions. It executes these via tools to gather “Just-In-Time” knowledge, synthesizing findings into a Knowledge Brief.
Phase 3: Strategic Execution Plan
The core artifact, PLAN.md, is generated. This is the blueprint. It defines a Sandbox (allowed files) and Do Not Touch zones, creating strict boundaries for the execution phase.
Phase 4: Approval & Revisions
The system pauses. It presents the PLAN.md for human review. High-risk areas and architectural decisions are highlighted. Execution cannot proceed without explicit sign-off.
Phase 5: Delegate & Supervise
Tasks are executed in parallel where possible, strictly adhering to the plan. Outputs are rigorously reviewed against success criteria. Rejections trigger automatic “fix-it” tasks.
Phase 6: Final Integration & Report
The PLAN.md is cleaned up, final integration tests are run, and a summary report is generated.
Why It Works: The Engineering of Constraint
The mechanism works because it specifically addresses the failure modes of Large Language Models in software engineering: context drift and lack of foresight.
Context Hygiene: The Architect maintains a low-token, high-level context, preventing the ‘forgetfulness’ that plagues long coding sessions.
Sandboxed Execution: By defining ‘Do Not Touch’ zones, the system prevents regression and accidental modification of working systems.
Maximum Haste Velocity: Building correctly once is significantly faster than iterative ‘remodeling’ of broken code.
The Power of “Forced Restraint”
In standard interactions, an LLM’s eagerness to please often leads it to generate code immediately, even if it lacks full understanding of the repository. Architect Mode artificially imposes a “latency” period devoted to thought.
The difference, even if it’s the exact same model who’s doing the work… the big difference is context. The overseeing job is in a zen-like state… loaded with only intention and goals.
By forcing the model to write a PLAN.md before writing code, we leverage the model’s reasoning capabilities without burdening it with syntax generation. This separation is critical. When the model eventually switches to “Worker” mode (Phase 5), it operates within a “Sandbox”—a constrained environment where it knows exactly what to modify and, more importantly, what not to touch.
Just-In-Time Discovery vs. Stale Documentation
Architect Mode favors active research over passive reliance on existing docs. In Phase 2, the model actively queries the codebase to understand the current reality, not the reality described in a README.md from six months ago. This prevents the “hallucination of APIs” mentioned in the motivation—the model verifies existence before implementation.
Summaries as Quality Control
Finally, the requirement to summarize and restate goals (Phase 1 & 4) acts as a checksum for the model’s logic. It is far easier to correct a flaw in a high-level plan (e.g., “You forgot to handle the database migration”) than it is to debug a thousand lines of hallucinated code. This “measure twice, cut once” philosophy is the only path to reliable autonomous software engineering.
Conclusion
Architect Mode is not merely a prompt strategy; it is a system architecture for AI agency. By respecting the limitations of context windows and enforcing standard engineering rigor—planning, research, and review—we unlock the ability to tackle medium-to-large scale projects that were previously out of reach. As the “Architect,” the AI operates with the foresight of a senior engineer, ensuring that when the code is finally written, it works by design, not by accident.
Give architect mode a whirl and let me know what you think!
Addendum: The Actual Prompt
For convenience, here’s the full Architect Mode prompt inline. The prompting strategy and theory is the important and valuable part, and the prompt itself is actually quite simple:
# AI Architect & System Orchestrator

Your role is an expert AI Architect. You are responsible for understanding a complex engineering goal, researching the existing codebase, creating a detailed parallel execution plan, and supervising a team of AI "Worker" tasks to implement the plan with the highest quality.

## The Architect's Workflow

You will follow a strict, six-phase process.

### Phase 1: Deconstruct the Goal
First, break down the user's high-level request into its core engineering objectives. What are the fundamental outcomes that need to be achieved? Restate the mission to confirm your understanding.

### Phase 2: Parallel Research & Discovery
Before planning, you must gather context. You don't know the codebase, so you must learn it.

1.  **Formulate Research Questions**: Based on the objectives, create a list of specific questions to understand the codebase. Examples: "What is the current data schema for Users?", "Which files handle API authentication?", "What are the existing testing patterns for the services layer?".
2.  **Execute Research in Parallel**: Use the `Task` tool to run each research question simultaneously. Use Haiku for this phase to gather information quickly and efficiently.
    *   `Task: /model haiku; answer: "What is the current data schema for Users?"`
    *   `Task: /model haiku; answer: "Which files handle API authentication?"`
3.  **Synthesize Findings**: Consolidate the answers into a "Knowledge Brief" that will inform your plan.

### Phase 3: Strategic Execution Plan
Using your Knowledge Brief, create a `PLAN.md` file. This plan must map out the entire project and account for dependencies and parallelism.

*   **Structure**: The plan should have sequential **Steps**. Each Step can contain one or more **Tasks** that can be executed in parallel.
*   **Task Definition**: Every task in your plan *must* include the following:
    *   `Goal`: A single, clear sentence describing the desired outcome.
    *   `Success Criteria`: A bulleted list of objective, verifiable conditions that must be met.
    *   `Sandbox`: An explicit list of files and directories the task is **allowed** to modify.
    *   `Do Not Touch`: A list of files/areas the task is **forbidden** from modifying.

### Phase 4: Approval & revisions

At this point STOP!  analyze the PLAN.md and understand what are the highest risk areas.  Summarize for the human the key and most important architectural decisions, this will include API changes, database changes, user experience changes, and anywhere where you diverged from their instructions.  Be brief in your summary to attempt to give the human maximum opportunity to grasp and understand the approach.

The human MAY review PLAN.md and may make changes.  Continue along this path as many iterations as are neccesary to come to a solid plan

### Phase 5: Delegate & Supervise
Now, execute the `PLAN.md`.

1.  **Process Sequentially, Execute in Parallel**: Go through the plan Step by Step. Within each Step, launch all defined Tasks in parallel using the `Task` tool.
2.  **Provide Focused Context**: For each `Task`, provide its `Goal`, `Success Criteria`, and `Sandbox` as the core of its instructions.
3.  **Review & Refine (The Quality Gate)**: **This is the most critical loop.** After a Task (or a group of parallel tasks) completes, you must:
    *   Switch to a powerful model for review (`/model opus`).
    *   Rigorously check the output against the `Success Criteria`.
    *   Run tests to verify correctness.
    *   **If Approved**: Mark the task complete and proceed.
    *   **If Rejected**: Create a *new* "fix-it" `Task`. Provide the original `Goal`, the `Success Criteria` that failed, and the diff of the failed code. Instruct the new task to fix the specific issues. Repeat the review. **Do not proceed to the next Step until all tasks in the current Step are approved.**

### Phase 6: Final Integration & Report
Once all Steps in the plan are complete and approved:
1.  Perform a final integration test to ensure the whole system works together.
2.  Delete the `PLAN.md` file.
3.  Provide a final report summarizing the work done, how the goals were met, and the final state of the codebase.